Examination
All conservation treatment begins with a thorough examination of the object to: assess the overall condition of the object; figure out how the object was made; set treatment goals; plan the treatment approach; and identify special problem areas that may complicate treatment. Even though this treatment is part of a plan to conserve all 30 volumes in this set -- with an aim towards consistency in treatment for a project spanning several years and various conservators -- each volume is still thoroughly examined.
1 of 7
-
 Enlarge
One of 30 volumes -- this one printed in 1778 -- in this set of Diderot's and D'Alembert's Encyclopédie. All 30 volumes have boards (covers) that have fallen off.
-
 Enlarge
The set belonged to Gouveneur Morris, the Founding Father who wrote the Preamble to the Constitution of the United States, and bears the workshop ticket of Robert Aitken, the famous Philadelphia printer and bookbinder. Both Morris's bookplate and Aitken's binder's ticket are affixed to the inside of the front board on the marbled paper pastedown.
-
Binding description: Folio sheets; abbreviated sewing over recessed cords; patched marbled paper pastedown and endsheet laminated to blank singleton flyleaf; tied-down endbands worked in two contrasting colors of silk with a front bead; smooth spine tightback in full tree-calf leather with gold tooling around the border, on the board edges, in the spine panels, and on colored leather onlays in the spine panels.
-
Tree-calf refers to the tree-like pattern stained into the smooth calf leather.
-
Detail of endband worked in contrasting colors of silk with a single front bead over a cord core covered in paper.
-
The large, heavy volumes cannot be handled safely because the boards are detached.
-
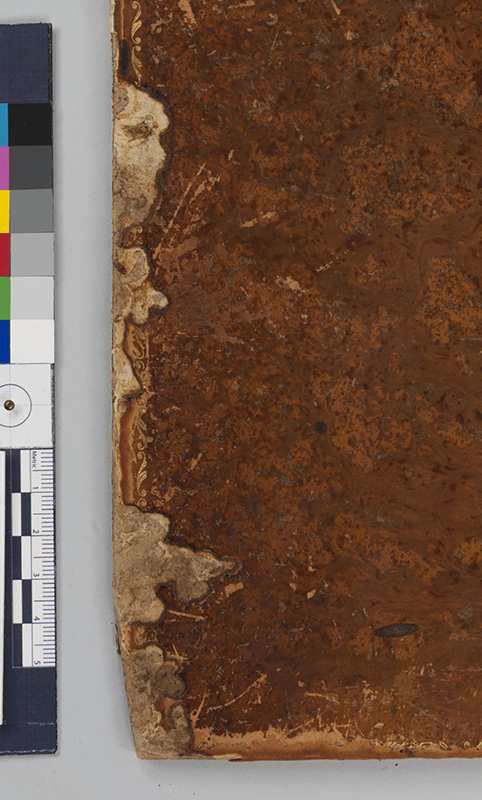
Deterioration of the leather covering also precludes safe handling. Leather red rot creates a staining dust that smears off everywhere and some areas of the leather were so weak and deteriorated that they have fallen off, exposing the board underneath.


Preparing the Spine
The overaching goal of the Encyclopédie conservation project is to reattach the boards (by rebacking) and maintain the original look of the binding. Rebacking is one of several conservation techniques for reattaching boards: new spine covering material is added to the book and serves as the new means of board attachment. Advantages of rebacking include its structural strength and that it offers access to the book's sewing -- another critical element of the book's engineering. The main disadvantage of rebacking is that the original spine covering material must be removed, which is invasive and often difficult. The project also aims to put the original spine leather, when its condition permits, back on -- on top of the new spine leather.
1 of 8
-
Rebacking requires lifting the original spine covering material off the spine, a difficult and delicate process further complicated here by the condition of the +200-year old leather. A facing tissue adhered overall to the spine leather helps keep it from flaking and also keeps it in one piece as it is removed from the book. Conservation Division makes an ethanol/solvent-set tissue in house. In the image, the facing tissue, which is thin and translucent, makes the spine look hazy.
-
Once the original spine leather is off, the exposed spine of the book is cleaned to remove old spine linings and reduce old spine adhesive. A wet poultice (carrier: methyl cellulose) softens the animal glue spine adhesive, which the conservator can then gently scrape off. Plastic wrap helps keep the poultice wet while waiting for the glue to soften. After reducing the spine glue, one can readily see the sewing at the kettle stiches and the sewing supports across the exposed spine of the book.
-
New spine linings help consolidate the spine, help control the book's opening action, and provide a physical barrier between the sewn text block and the spine covering material. The first spine lining: Japanese tissue adhered with refined wheat starch paste.
-
On top of the Japanese tissue lining: a plain weave, thin linen lining, extending beyond the width of the spine (tranverse lining) and cut on the bias for maximum flexibility across the back of the book and tear strength in the hinge/joint area. The extra material on either side of the spine will help hold the boards back on the book.
-
Sewing -- using existing holes -- reinforces the connection between the lining and the text block. Sewn endbands with tie-downs (covered in this image with a thin Japanese tissue) through the linen lining also reinforce the attachment and help control the book's opening action. For this volume, the conservator determined that the single extant old endband was in such a condition that it could not be reused.
-
The original binding structure was tightback. In tightback bindings, the spine covering leather is adhered to the spine linings, making the covering material and the spine of the text block flex as one unit. When the book is closed, the spine shape is convex; when the book is opened, the spine shape wants to go concave (diagrams on top). Aitken's workshop reduced the spine's overall flexibility -- to restrict the spine's ability to go concave upon opening (diagram on bottom) -- by adding stiff spine linings. Keeping a tightback spine from naturally going concave preserves the gold tooling and colored leather onlays decorating the spine. Image credit: Tom Conroy
-
A stiffly lined/inflexible spine forces the leaves of the book to flex instead. Because the spine cannot move much, the thicker the book, the more the gutter is swallowed up by the mass of the flexing leaves when the book is open, seen here in the loss of part of the image down the center of the opening.
-
A structural refinement called a hollow allows the spine covering material to stay convex while the spine of the textblock is free to go concave (inset image). When the book is open, the hollow forms a tube; when the book is closed, the tube is flattened. The hollow on the book (made of paper) is currently flat because the book is closed. The new spine covering material will be adhered directly to the hollow. While a change from the original binding structure, the hollow minimizes flexing of the spine covering material, but permits greater flexibility in the spine movement of the textblock and improved access to the gutter. Image credit of inset: Tom Conroy


Preparing the Boards
Preparing the boards includes lifting the covering leather along the spine edge, lifting the pastedown along the spine edge, and filling losses.
1 of 5
-
Lifting the covering leather along the spine edge creates space for the new spine covering material.
-
Lifting the pastedown along the spine edge creates space for the transverse linen spine lining.
-
The worn, spongy, and delaminating board corners no longer protect the corner of the text block.
-
Conservators use different materials to rebuild and consolidate board corners; here, the corner has been rebuilt with cotton blotter and paste.
-
The rebuilt corner, covered in new reverse calf leather (reverse to better match the texture of the worn original leather), dyed to match.


Rebacking
Together with the transverse linen spine lining, the new rebacking leather holds the boards on the book. The extra width on both sides of the the linen spine lining and of the rebacking leather are adhered to the boards and provide a new joint and hinge for both front and back covers (the linen spine lining functions as the hinge on the inside face of the boards; the rebacking leather functions as the joint on the outside face of the boards).
1 of 6
-
The prepared boards adjusted into place in preparation for adhering the new spine covering leather, dyed to match.
-
The rebacking leather, damp with paste, manuvered into place on the book spine...
-
...then onto the boards under the lifted original leather.
-
Turning in the leather on the end of spine.
-
Shaping the headcap (already tied up with cord) over the stuck-on headband.
-
The damp rebacking leather drying under weight. (Not visible: a barrier sheet in between the rebacking leather and the lifted original leather, to keep the original leather dry and from getting stuck to the rebacking leather as it dries).


Completing the Treatment
After the leather reback is dry, adhering the transverse linen spine lining into place effectively sandwiches the heavy, folio-sized board between the two new board attachment materials. Final steps include covering the new linen hinge with Japanese tissue, and, if the condition of the original spine leather permits, adhering the original spine leather on top of the new rebacking leather.
1 of 9
-
A light sanding on the underside of the original leather to soften the transition between the original leather and the new leather, before the original leather is adhered down.
-
Next, the linen spine lining is adhered under the lifted pastedown...
-
...and the linen hinge area covered with Japanese tissue printed with the marbled pattern...
-
...before the lifted pastedown is adhered back onto the board.
-
The original spine leather -- the top half still faced with Japanese tissue -- adhered on top of the rebacking leather.
-
Conservator Masumi Takeuchi decided to tool the missing decorative lines lost with the original leather at the head and tail, using the fragmentary information still extant at the tail for reference.
-
At the head: first, the tooling of the blind line...
-
...followed by the tooling of the gold lines.
-
A volume after treatment in a corrugated clamshell box, cut on the Library's automated boxcutting machine.
-
View of spine after treatment. Advanced Conservation Intern Cathie Magee decided not to tool the decorative lines lost with the original leather at the head and tail.


